Journal entry
9 MacBook Desk Organization Ideas That Work

A good MacBook setup usually looks messy for one boring reason: the laptop has nowhere to go once you add a monitor, charger, audio interface, card reader, and keyboard. It ends up half-open on the desk, eating space and collecting cables. The best MacBook desk organization ideas fix that first. Not with bins and trays. With layout.
Start by deciding where the MacBook should live
Most desk clutter is really placement failure. If the MacBook stays on the desktop, every other object has to route around it. Your keyboard shifts forward. Your mouse ends up too far right. The charging cable crosses everything. Then you start buying accessories to manage a problem caused by the laptop itself.
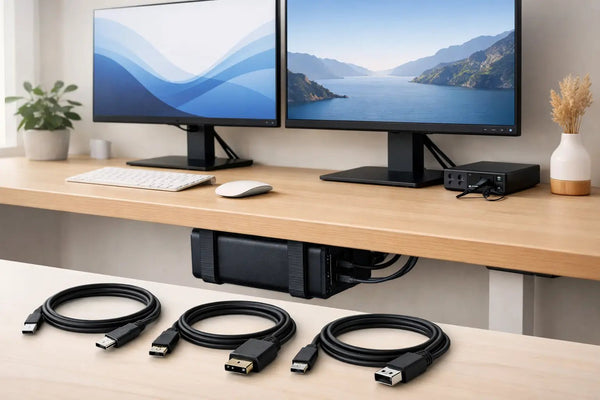
If you run your MacBook docked to an external display, move it off the work surface entirely. Under-desk mounting is usually the cleanest answer because it removes the laptop from sight without making it hard to reach. For that kind of setup, the SlideUnder Pro Crossbar Edition is the right kind of fix for MacBook Pro 14 and 16 users, especially on thicker desktops or sit-stand desks where a basic under-desk mount can get awkward. It keeps the machine secure, clears the top of the desk, and makes the setup feel intentional instead of improvised.
That trade-off is simple. You lose direct access to the built-in screen. If you still use the MacBook display as a second monitor, don’t hide it under the desk. In that case, an edge mount makes more sense.
MacBook desk organization ideas that actually change the desk
A lot of setup advice stays at the surface level. Add a tray. Add a riser. Add a drawer. Fine, but the desk still has the same footprint problem. The better move is to reduce the number of things that need to sit on top at all.
1. Get the laptop off the desktop
This is the biggest win per inch. If your MacBook is usually closed and connected to a monitor, mount it. Under the desk if you want it gone. At the edge if you want quick access to ports and the power button.
For edge mounting, the SlideEdge Pro works well when you want the laptop visible but not in the middle of your work zone. Left and right variants matter more than people think. Put the MacBook on the side that matches your cable path, not the side that looks balanced in a photo. If your monitor I/O and power are on the left, don’t force a right-side mount just because your speakers are symmetrical.
2. Reduce the setup to one cable you actually use
Cable clutter gets blamed on bad cable management, but the real issue is cable count. If you plug in power, display, SSD, audio, and Ethernet separately every time you sit down, the desk will never stay clean for long.
A single-cable setup is the point where organization stops being cosmetic and starts being practical. The SlideLink Pro USB4 80Gbps cable exists for exactly that. One cable from the dock to the MacBook. Power, displays, peripherals. Done. If your current desk requires a five-step docking routine, that routine is the mess.
There is a limit here. Single-cable only works if the rest of the chain is sorted. A bad dock, poor monitor hub behavior, or the wrong cable length can still create friction. But once it’s right, you stop touching half the stuff on your desk.
3. Keep the centerline empty
The middle of the desk should be boring. Monitor centered. Keyboard centered. Nothing parked between them. That area is where clutter becomes visual noise fastest because it sits in your field of view all day.
If you like keeping a notebook, put it off-center and only bring it in when you need it. Same with headphones. Same with your camera. Desk organization is not about making every object fit. It’s about deciding what deserves permanent space.
4. Build around cable exit points, not around objects
People usually place gear first and think about cables later. That’s backwards. Start with where cables enter and leave the desk: monitor power, dock connection, wall outlet, speaker cables, Ethernet. Then place the hardware so the shortest cable run also happens to be the cleanest one.
This is where edge-mounted MacBook placement can beat under-desk mounting. If your dock sits behind the monitor arm and your MacBook needs frequent unplugging, a side mount may create less strain and less visible cable than routing everything downward. Clean depends on your desk geometry, not on a universal rule.
The mistake most clean desk setups make
They optimize for the photo, not for the work.
A desk can look minimal and still be annoying to use. The keyboard has no room. The monitor is too low because a shelf was added for aesthetics. The laptop is hidden so well that plugging in an SD card becomes a chore. That kind of setup never stays tidy because you keep breaking the system to get work done.
Good organization removes steps. Bad organization adds them.
That’s why vertical storage for the MacBook on top of the desk often ends up as a halfway solution. It saves some space, but the laptop is still visible, still cable-adjacent, and still occupying premium surface area. Better than flat on the desk, sure. But if the goal is for the desk to disappear, it doesn’t go far enough.
Match the mount to how you actually use the machine
Closed-clamshell setup
If your MacBook spends most of its life connected to an external monitor, under-desk is usually the cleanest route. It gets the laptop completely out of the visual field and leaves room for writing, sketching, or just not staring at hardware.
This is where a purpose-built mount matters. A generic holder can technically store a laptop, but fit and placement are what keep it from rattling, sagging, or looking temporary. Sunny prints these in-house to under 0.1mm calibration, which matters because small fit errors turn into daily annoyances fast. Especially on a machine you plug in and remove often.
Open-lid secondary-screen setup
If you use the MacBook display alongside your main monitor, don’t force an under-desk solution. Use an edge mount so the screen stays accessible without taking over the whole desk. You keep the second display while freeing up the center area.
This works well for developers watching logs, editors keeping bins open, or anyone who wants reference material on the built-in display. It won’t look as stripped-back as a full hidden setup, but it’s more honest to the workflow.
Awkward desk or non-standard build
Some desks make standard mounting hard. Thick tops. Metal framing. Shallow depth. Sit-stand crossbars in the wrong place. If your setup doesn’t match the usual assumptions, forcing a stock solution is how you end up with a mount you stop trusting.
That’s the point where a custom build is worth asking about. Not because custom is fancy. Because an organization system only works if it matches the desk you already own.
A cleaner desk needs fewer visible categories
One trick that helps when planning the desk is to stop thinking in products and start thinking in categories. You need input devices, display, lighting, charging, and maybe audio. That’s it. Every extra visible category increases the chance the desk feels busy.
For example, if your dock can stay hidden and the MacBook can stay mounted, you remove two whole visual objects from the desk. If your charger is part of the docked setup, that brick disappears too. Suddenly you are not managing ten items. You are managing the monitor, keyboard, mouse, and one or two tools you actively touch.
That’s why the best MacBook desk organization ideas usually look boring on paper. Hide the laptop. Reduce cable count. Keep the middle clear. Route around the desk’s real geometry. None of this is decorative. It just removes reasons for clutter to exist.
Don’t over-organize what should stay flexible
Not every object needs a fixed home. If you mount everything and label every cable path, small changes become a hassle. A desk used for real work needs some slack.
Leave room for a notebook. Leave one easy-access port. Don’t bury the thing you unplug twice a day. Clean setups last when they account for habits instead of trying to correct them by force.
If you’re adjusting your desk one piece at a time, start with the MacBook position and the cable path tied to it. That decision affects everything else more than the tray, the shelf, or the pen cup ever will. Get that right, and the desk starts organizing itself.